Plumeria shrubs are highly sought after because of their many benefits. Not only do they produce such irresistible fragrances that are unmistakable, but their leaves are also used for many other medicinal and commercial purposes, such as the treatment of diabetic wounds and other skin diseases, as well as making fashion necklaces.
You should add several Plumeria pots to your collection of garden plants to have as much of its lovely fragrance as possible; also, you won’t have to worry over making provisions whenever a friend requests to pick one of your pots for themselves if there’s more to go round. Keep reading if you want to learn how to propagate Frangipani pots.
Propagating Plumeria Plants

Plumeria shrubs are best propagated during spring or late summer, although they can grow new roots at any time of the year. A good stem for propagation should look gray or brownish, indicating its maturity and age.
Frangipani plants are generally well adapted to their environments and demonstrate a high tolerance for sunlight, water, and soil nutrient concentrations; their immunity to excessively salty soil potting and prolonged droughts is also well recognized.
They can be easily maintained indoors or grown outdoors to bask in the brightness of sunshine during their growing summer season. With the right care and attention, your potted Frangipanis will start blooming in 1-3 years.
Propagating Plumeria from Cuttings
An important benefit of propagating Frangipani pots from cuttings is that cuttings bloom much faster than those grown by seed germination. Frangipani cuttings begin to bloom from 1 to 3 years after propagation, whereas those cultivated naturally may take three years or more before you begin to see signs of blooms on them.
It’s best to propagate Plumerias from stem cuttings to guarantee a higher success rate. Cuttings can be made from a mature plant with healthy leaves and long stems. Each stem cutting should be between twelve to eighteen inches long, bearing a good number of healthy leaves.
You can make the cuts with sharp, clean garden scissors or a kitchen knife, be careful to make each cutting just below the nodes. Younger stems directly connected to the main stem are ideal for cuttings.
The cuttings should be left for a day or two to heal at the cut edges. You can also pluck off the extra leaves close to the lower end of the stem because they will rot if inserted in a rooting medium.
Rooting the Plumeria Stem Cuttings

You can easily root them in a transparent water glass vase or a traditional potting mix; both methods will give excellent results. Remember that rooting in water will later require transplanting the rooted cuttings to a Potting medium.
I prefer rooting in water initially; it’s easy to tell which cuttings were viable and which weren’t. It’s also easy to observe the development of the cuttings. The process isn’t complicated; you pour natural clean water into the rooting vase and insert the calloused cuttings.
- Place the rooting vase where there’s adequate indirect sunshine, and as long as you change the water regularly once it looks cloudy inside, your cuttings will root in 2-3 weeks, after which they should be transplanted immediately the root grows up to 2 inches long.
Rooting your Plumeria cuttings in a Potting medium is easier, more direct, and less stressful to you, the propagator, and the rooting cuttings because it eliminates the need for transplanting them.
- First, pour the soil mix into the Pot and make some holes on the surface, not more than an inch deep.
- Next, place your cuttings into the holes and strengthen their grip with more soil mix around each cutting. Several cuttings can be rooted together in the same Pot initially.
- If you’re using a rooting hormone such as natural honey, cinnamon, or apple cider, you should dip the calloused edge of the cuttings first into the rooting hormone before planting.
- Water the Pot immediately with a light shower by misting or a spray, and place it at a warm place where it gets a lot of bright indirect sunlight, and your cuttings will begin to have new growths in 2-3 months times.
Propagating Plumeria by Grafting
Grafting the Frangipani stem cuttings is another way to propagate new Plumeria plants. Grafting has a higher success rate. It is quite rewarding because you can save almost a year or two of waiting compared to rooting their cuttings by simply grafting a budding stem into an already-developed root system.
Grafting is favored among garden propagators because it ensures the preservation of desirable characters in both the rootstock and the grafted stem. It also encourages cross-pollination and the activities of insect pollinators.
- simply cut off a mature stem with 2 or 3 buds and leaf nodes. The stem cuttings should be minimum 12 inches long and half an inch thick.
- Also, cut off the head or main branch of the chosen rootstock on a diagonal axis. Ensure both cuts are identical, preferably in a T- shape.
- Now, place the scion on the rootstock, making a tight grip, and bind them together using tape and grafting wax. Remove the wax and tape after a month or two once new foliage begins to grow on the scion.
Propagating Plumeria by Seed Germination
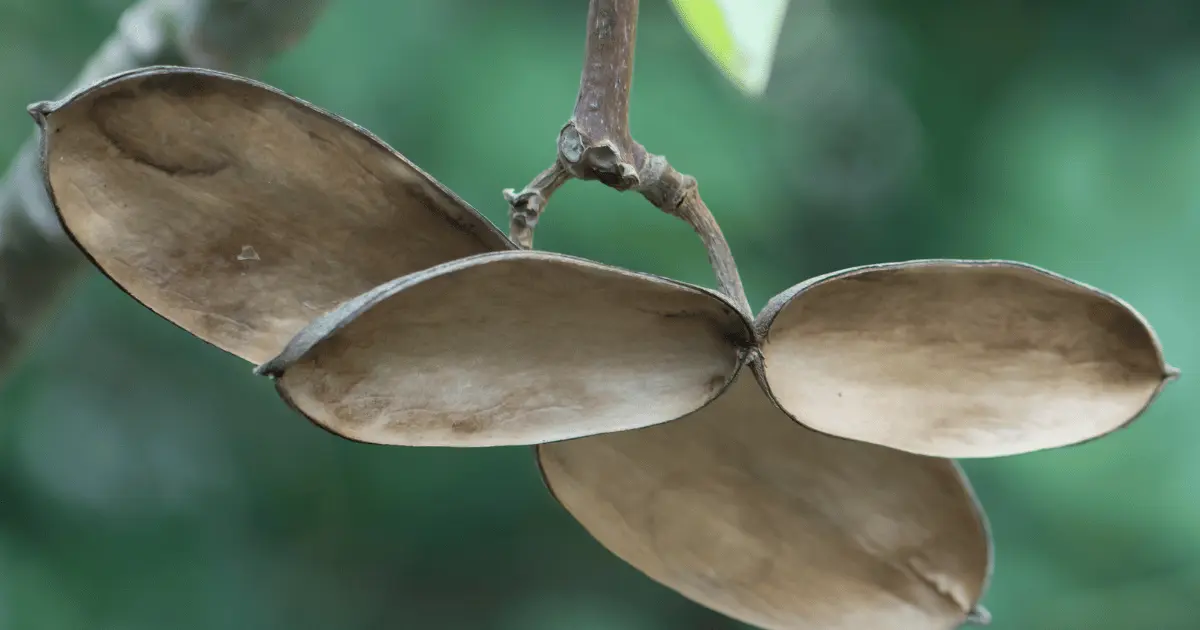
Frangipani seeds are encased in hulls that grow from their pollinated flowers. They appear as miniature green bean husks, each bearing three enlarged seeds. As they attain maturity, the hulls begin to dry out, gradually turning brownish until they burst open to reveal their feathery seeds.
Harvested seeds can remain viable for up to two years when properly preserved in a cool and dry environment. Once you’re ready to propagate them,
- First, get them submerged in warm water for eight hours or until you notice their feathery ends begin to expand.
- Get your organic potting mix ready and pour some into the Pot until it fills to 2/3 of its capacity.
- Gently plant the Plumeria seeds by inserting them into the surface of the Soil Mix to a depth of not more than 1 inch.
- Water the Pot immediately, either by misting or spraying, and gently place it in a warm spot under indirect sunlight, an AC vent, or the back of the refrigerator.
- It would be best if you continued Misting or spraying for the next one or two weeks until the first foliage appears; afterward, you can resign to developing a watering cycle only when the topsoil of the Pot looks dry and crispy.
The young Frangipani pot will require more indirect sunlight as it gets bigger for up to three months, and you may need to repot it in a bigger potting as it clocks a height of 6-7 inches.
Plumeria shrubs naturally enjoy being under the open sunshine at maturity; too much of it, however will negatively affect their growth. They need to be under sunshine for up to eight hours daily with temperatures above 65°F (18°C) to bloom.
Some indicators to look out for include crumbling or falling off their leaves. As a rule of thumb, please don’t leave them under direct sunlight at temperatures above 90°F to 95°F (32°C to 35°C).
Watering your Frangipanis
They’re such an easy-care variety that you won’t have to labor excessively over their maintenance. A mature Plumeria tree can continue flourishing in a mildly moist or semi-dry soil potting for a long time.
You can keep watering them once in two or three weeks during their active growing seasons; ensure the soil potting is only left for three days. Watering during winter should be reduced to once a month or thereabout; ensure they’re not left to freeze in the cold. They should be brought indoors when the temperature drops below 40°F (4.5°C).
Best Soil Mix Sample for Potting Frangipanis
A small to medium-sized clay, ceramic or plastic Pot is ideal for their propagation. Frangipanis are best grown in a fast-draining soil-based potting mix, preferably with a greater proportion of perlite and other similar compounds that improve soil aeration.
I recommend a soil mix formula that has given me tremendous results. You can go for a cactus mix, a succulent soil mix, or a blend of 1 part cactus mix with 1 part perlite. A soilless potting mix most ideal for Plumeria would comprise 70% cactus or succulents mixed with 30% perlite or vermiculite.
Among the many names they’re called, I like to remember them as Pagoda tree, Hawaiian Lei Flower, West Indian Jasmine, and also Temple Tree. Their vibrant colors and wonderful fragrant essence make them captivating and mesmerizing when they bloom.
Frangipani plants are sometimes regarded as consecrated plants among communities in South Eastern Asia. They have also been attributed to the gulancha and Kath golap in Bangladesh and some parts of India, regarding them as a close relative of the most Sacred plants in a religious sense.
Their fragrances are well coveted in their varieties, giving off perfumes of pineapple, grapes, banana, coconut, ginger, plum, gardenia, and even candy aromas. It’s a misconception, however, to think that they’re all sweet and nice because one bite of their bitter foliage or stem might cause the greatest of irritations to anyone.