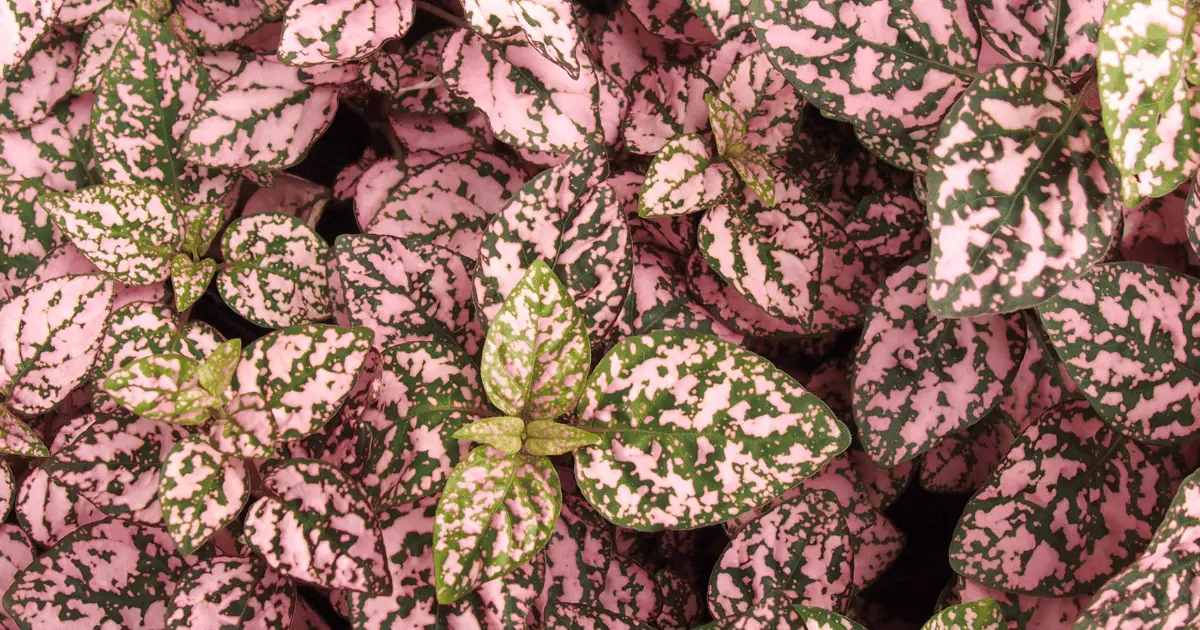
Polka dot plants derive their unique, peculiar appeal from highly speckled white, pink, purplish pink, and even reddish evergreen elliptical foliage that appears like a splash canvas of an iconic painting. Their extensive shoots can stretch as high as 12 inches (30cm) in height, making them the perfect tropical garden shrubs.
Hypoestes phyllostachya share a history with South Africa, Southeast Asia, and Madagascar and are recognized as a highly adaptable genus of seed-bearing flowering plants. Their seeds are contained in a multifaceted unconcealed pod.
Propagating Polka Dot Plants
Polka dot plants are commonly cultivated as a sensory stimulating decorative garden plant, which can now be easily propagated indoors and outdoors in tropical and subtropical regions. Although pruning can help keep them flourishing, you’ll need to propagate them regularly to make them feel rejuvenated and refreshed.
The easiest way to propagate Polka dot plants is by stem cuttings rooted in a water jar or soil mix potting. I’ve also grown several pots from root divisions, which is quite easy to accomplish in the following simple steps.
It would help if you propagated your Polka dot plants once they start becoming leggy, sticking out their little roots through the drain holes on their pots. The best seasons for their propagation fall in between early spring and late summer.
Propagating Polka dot Plants from Stem Cuttings
It’s easier to collect the cuttings just as the pots gradually begin to look alive again after the winter resting season. Select the leggy stems with possible outgrowths on them to make the cuttings. Each stem should be up to 4 inches long and have 2-3 leaves on it.
Cut the base of the stems right below the leaf nodes; the close the stem is to the plant bottom, the better its chances of rooting. Use clean cutting tools to prevent infection of the cuttings later in their growth stages.
Allow the cuttings to rest for a couple of hours for their wounds to heal before rooting them in water or a potting medium.
Rooting your Polka dot Cuttings in Water
The cuttings can root and grow in water; some gardeners prefer to grow them entirely in a transparent water jar, which usually limits their growth limits. It’s advisable to transplant them in a potting mix once they’re fully rooted.
Insert the cuttings in a glass jar or transparent container with water. The water level should be 3 inches, with only the lower stems fully immersed. Pull off any leaf submerged in the water and place the jar behind a well-lit window with bright indirect sunshine.
The cuttings will be well rooted after 7-10 days, after which they should be transplanted to avoid decaying inside the water. Remember always to replace the water in the jar once it appears opaque inside.
Rooting the Stem Cuttings in a Potting Medium
Planting them directly in a potting mix is a simpler method of rooting your cuttings. With the right potting mix, the cuttings have a higher chance of rooting successfully.
Pour some soil mix into the pot and insert the cuttings at no more than 1-inch depth. If you like to use a rooting hormone powder to enhance their performance, dip the cuttings in the rooting powder before planting.
Water the pot thoroughly immediately after planting and set it on a flat surface to drain off excess water. After this, place the pot in a perfect spot to receive the right amounts of indirect sunshine daily, and it will begin to root after 7-15 days.
Propagating Polka dot Plants by Root Division
This is also a very efficient way of dealing with overgrown leggy polka dots. Dividing a mature plant from the roots is easy and fun, even for a newbie gardener.
First, remove the older plant from its pot. I usually water it thoroughly the previous day to make the soil more workable. If there is a bit of difficulty, bend the pot sideways and roll it gently on a flat surface till it slides out easily.
Once it’s come out of its hiding, gently grab it from the upper stems firmly and shake well until the roots begin to lose all the soil cleaving on them. You can use your fingers to brush through the roots to remove any attaching soil particles.
By now, you’ll see the sections of the roots that can be separated. Each section should have its corresponding stems and leaves fully attached to it. You may need a garden knife or scissors to cut off the roots.
Congratulations, your Polka dot plant is now divided successfully. Each section can be potted either in water or a new soil mix potting to grow a new plant, and you can grow as many sections as available in your root divisions.
Growing your Polka dot Plants in the right Potting Medium
Polka dot plants are relatively easy to propagate in a pot; they don’t require very large pots; instead, they prefer small clay, ceramic or plastic pots not more than six inches wide.
These simple, low-maintenance garden plants can grow to maturity and bloom lavishly within a year, so there’s not much fuss about propagating them.
They will flourish magnificently in a soil mix potting that is rich in organic compounds and has good drainage.
They don’t have a particular soil mix requirement to grow, which is great. Any regular cactus soil mix or succulents potting mix will be ideal for maximum results.
But if you wish to improve their performance, you can add to the soil mix nutrients using vermiculite, pumice, or perlite to improve drainage. I recommend you always keep their pots cool and moist for most of the day; but ensure the soil mix doesn’t get damp and soggy to prevent rotting and decay of the roots.
Watering your Polka dot Pots
I usually encourage first-timer gardeners to patiently observe them before deciding their best watering calendar: too little water and their leaves begin to wrinkle and wilt as their tips get brownish; and too much watering can also cause their leaves to appear bloated and their stems become weak, breaking off easily.
A great practice is always paying attention to their potting soil and only watering the plant when the topsoil appears dry and powdery. They always like their leaves suspended in a moist and cool environment.
How Much Sunshine should you allow for your Polka dot Pots?
Although they can readily tolerate some direct bright sunlight for an hour or two after they’re fully grown, it’s best to propagate them under shade or behind bright indirect sunshine. They will most likely become discolored when left for too long in a dimly illuminated spot, so take great care to ensure proper exposure.
It’s quite easy to tell if they’re receiving the right amounts of sunshine from the appearance of their leaves because they don’t waste much time growing brightly pigmented leaves when the sunlight exposure is adequate. On the other hand, subjecting them to intense sunshine for too long might result in leaf and stem burns.
A general rule of thumb I like to encourage is maintaining a temperature range of 65°F to 68°F (18°C – 20°C). A perfect spot for them would be a South or East facing window with the blinds partially open for more than 6 hours daily.
Polka dot plants can begin to look leggy and ugly if you grow them in larger pots, and I find them particularly more appealing when they’re root bound in smaller pots. Unless you desire to grow them as natural and free-living outdoor decorative plants, in which case, it’s best to use reasonably bigger pots.
Their gorgeous and appealing effect on people is worth mentioning: they have the magical ability to alleviate mood swings by easily ‘lighting up’ their surroundings. Some of their psychological benefits include reducing nervous tensions and overtiredness.
The appearance of their multicolored, stylishly appealing leaves and flowers make them the perfect in-house garden plants.